I've been meaning to post this room for a while but haven't for some reason. This room is not completely finished yet but I'll post any updates. There aren't any window treatments or artwork hanging yet. I am also going to get a new bedspread sometime soon. I'll warn you now that there a quite a few pictures. If you choose to leave now, I understand. :) Oh yeah, and another warning (if you stick around) is that I don't take good "before shots". I always think I have enough and then later regret not taking certain photos. Oh well, no going back.
Here we go! The first BEFORE picture that I'm posting is shot from where this little orange arrow is on the floor plan.
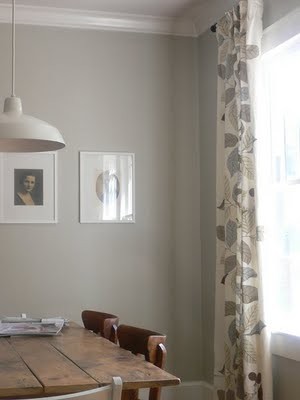
 This is what you see when you're entering our room from the sunroom.
 My girl Ruth Ann actually took that pic. ;) The room's walls, trim, and window lines were all painted light green. Much like the color below. The ceiling was a lighter shade of the green but like always, my camera's flash whitens things out.
The pictures don't always show what we could see in real life. In this room there were many smudgy, dirty places on the walls and faded paint where pictures hung for years. (These are all before)


 This next picture was taken by me and I was oblivious to the fact that people were in the shot. I edited the picture a bit for privacy...and because Cory was midsentence.
 The next picture is after we (Jeanne & me) painted the ceiling and primed the molding. It was amazing how much taller the room looked after we did that. This is also a picture of the light fixture. We took off the glass dome to make it brighter.
 But it still didn't produce much light for the whole room.
 I'm blurred out of this next picture because I was looking rough.
 Here's a close up of the fan that Cory installed. We added a medallion to pretty it up a bit.
 We had some help painting the bedroom. Much thanks goes to Ruth Ann, Jon, mom, and dad.
The paint I chose for the room was Glidden's Barely Jade.

In the store it looked blueish-green and was called Barely Jade so I thought it for sure was greenish but when we painted it on everyone commented how they loved the blueish-gray that I had chosen. Oh well, at least I like blueish gray!
Here's a shot of the room after it was painted.
 The next one is a shot of our bathroom & closest doors. Please excuse the closet mess. We had our dinky stackable shelves and I had my work clothes from the day draped on them.

 Now here's what you see when entering our room from the sunroom.


 I tried to write on the next photo but it's pretty small font. Please excuse R2D2's cousin in the bottom left corner. He's our noisemaker that we've had since we've been married. Our first apartment's air conditioner didn't work well so we purchased a room air conditioner and we got used to it drowning out noises when we sleep. We just use it as a sound machine now.

 Here are some side to side shots. These are the same photos from above.


 The next one is a shot of our bathroom & closest doors. Please excuse the closet mess. We had our dinky stackable shelves and I had my work clothes from the day draped on them.
 Now here's what you see when entering our room from the sunroom.


 I tried to write on the next photo but it's pretty small font. Please excuse R2D2's cousin in the bottom left corner. He's our noisemaker that we've had since we've been married. Our first apartment's air conditioner didn't work well so we purchased a room air conditioner and we got used to it drowning out noises when we sleep. We just use it as a sound machine now.
 Here are some side to side shots. These are the same photos from above.


That's about it. We are really enjoying our new bedroom and the space it provides. I'll try to post some more pictures when we make some changes. Also, as far as the no-blind situation, it's not that bad. I have some ideas of what I want but just haven't made the purchase yet. Our bedroom is at the back of the house and is actually higher off the ground so you can't peek into our windows. We are fortunate to have a very wooded area behind our backyard so only the birds and bugs are getting to see in at night. Also, since it's woody we don't have streetlights lighting our room up at night. Just the light of the moon. It's actually quite nice. And the morning sunlight is also filtered by the trees for those days you want to sleep in. Here's my view in the morning. (sorry I couldn't get the picture bigger for some reason)
There you have it. It's not an extreme makeover but it is a change. I can't wait till we complete more projects so I can actually focus on decorating the rooms. Thanks for stopping by and I hope you have a blessed day!