Saturday, October 30, 2010

Cabinet Makeover

Today I'm posting a cabinet that I repainted this past week. I got this cabinet from my sister about 3 years ago when she was moving. It's a neat little cabinet that has been sitting at the top of our stairs in our apartment since we moved in. It has remained in the hallway mainly because of it's color. It was black with gold paint smeared on it and didn't really go with the decor in any of our rooms. I have been meaning to paint it for a long time but just recently actually decided to do it. Here it is before.
As I was inspecting the inside of the cabinet I found that the top of the inside had this little painting on it. It was a fun surprise. (This picture looks a little funky but it was the best I could get.)
First I took off the doors and knobs. Then I sanded the whole thing. I wanted to change the cabinet up a bit so I decided to take off the top panel's wood medallions and add a bigger swag decoration.

Then I glued the new wood piece to the door front with some wood glue. I also had to fill in the hole from the old knob with some wood filler.
After the glue dried, I primed the whole piece. It took me a while to figure out a paint color. My instincts kept telling me to paint it white but it seems like I already have a lot of white things in our home. I then wanted to try a bluish gray but couldn't find what I had in mind at the store. I then remembered that I had some leftover paint from the china cabinet I did a while back.
I mixed the leftover paint which helped save some money.
And here it is. I also got some new dropped pulls from Hobby Lobby.
I'm still playing with things to put on top of it now. Here's what I have right now though.
Here's a before and after picture side by side. Thanks for stopping by. :)


Monday, October 25, 2010

Lovin' Some Deals

On a few visits to some antique stores I've seen some old milk glass carriers that I've really liked, that look like this:

I have seen items very similar to this that cost between $40-$60. I've even seen a few online that were $90! In my book, it's not worth that much. The weekend before last as Cory and I were browsing around Hobby Lobby I found something that looked like what I wanted. I was super excited but then I saw the price tag which read $27.99. That may not seem like that much but I have a hard time purchasing things(clothes & small home decor) over $25. I thought I may try to use a 40% coupon that they have online and get it one day. Well, last Thursday was my birthday and I received some birthday cash during the week. Since I'm here in Tuscaloosa alone I celebrated my birthday by shopping on Wednesday night. I thought it would be too pathetic walking around the mall by myself on my actual birthday**...weird, I know. I went to Hobby Lobby to actually get something for school when I decided to look at the milk carrier again. To my surprise the section it was in was marked off 50%. Happy Birthday to me! I got it with no reservations since I had a little extra cash for $14. I was so happy. Here it is.
During the fall and winter I think it will serve as candle holders. During the summer I can't wait to use the jars as vases.

This milk glass container was the only purchase I made that day. I thought I'd save the rest of my moolah for a rainy day....Well, today it rained! As I was shopping for groceries at Target I made a stop down the home decor ailse and saw that this large magnifying glass that I've been eyeballing for weeks was on sale for 50% off. I got it for the small price of $7.00 I have so many places I can put this but for now it's sitting on top of our bookshelf in the office. You should really check out Target because there were lots of home decor and clothes on sale.
**Don't feel too sorry for me because I wasn't alone on my birthday. My sweet husband and wonderful parents paid me a visit and we had a great time and yummy food. :)

Sunday, October 17, 2010

Letters in a Jar

The other day on Life in the Fun Lane I read about ceramic balls with letters on them on sale at Michael's. I really liked them for some reason and decided to grab a few. I got them for the low, low price of just $1 a ball. I bought eight of them and brought them home. I thought they would look great in a mason jar, because in my opinion, everything looks great in mason jars. :) I actually ended up only putting seven letters in the jar because all eight wouldn't fit. I didn't want to just have one jar standing alone so going along with the letter theme I put some Scrabble letters in a smaller jar. These now sit on top of my recently redone coffee table.
I'm really pleased with the look and this was an inexpensive way to add something new to the room. If you like the letters then hurry over to Michael's and get some.

Thursday, October 14, 2010

German Chocolate Cake

Yesterday was my wonderful father's birthday. To help celebrate this past weekend I made a German Chocolate Cake for him.

Here's what you need:
1 package German Chocolate cake mix
1 cup buttermilk
1/2 cup vegetable oil
3 eggs
1 teaspoon vanilla

First you'll need to grease two 9 inch cake pans. You can do this by the old shortening & flour routine OR you can use a product I swear by: Cake Release.
I learned about this product back in 2003 when I took a cake decorating class. It always releases your cake beautifully from the cake pans. I love the stuff. You can find it at Hobby Lobby, Michael's, and sometimes Walmart. It's with the cake decorating things. Anyway, back to the recipe.
Mix all of the cake ingredients for at least 3 minutes or until well combined. Pour into the 9 inch cake pans and bake at 350 degrees for about 32 minutes.
Allow cakes to cool completely before frosting (about 30 minutes)

Now for the yummy pecan-coconut frosting.
You'll need:
1 1/2 cups chopped pecans
1 package (7 oz) flaked coconut
1 can (12 oz) evaporated milk
1 1/2 cups sugar
1 1/2 sticks of butter
4 egg yolks, slightly beaten
1 1/2 teaspoon vanilla

First you'll need to spread the pecans and coconut on a baking sheet and toast in the oven for about 7 minutes. Remove from the oven and set aside to cool.
Next put the evaporated milk, sugar, butter, egg yolks, and vanilla in a large saucepan over medium heat. Cook, stirring constantly, until thickened, for about 10 to 12 minutes.
Remove from the heat. Stir in the toasted pecans & coconut.

Cool to room temperature which will make it spreading consistency. (for about 30 minutes)
To quicken the cooling process I pour the frosting into a metal bowl and sometimes emerge the bowl in a larger bowl of ice.

Now frost the top of one layer of cake. Place the other layer on top and then frost the top.
Typically German Chocolate Cakes are only frosted in the center and on top. I like to frost the sides though. I used some store bought chocolate frosting for the side of my cake.
In hindsight I should have frosted the sides of the cake before the top. :)
Then I topped the cake with some chocolate covered almonds that I bought.
Here's my sweet parents before partaking in the birthday cake.

Thursday, October 7, 2010

Burlap Pillows

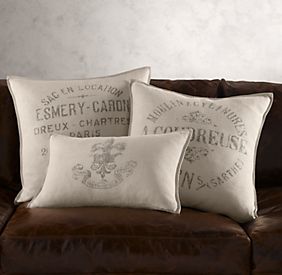
After Cory & I redid the table for our "office" I wanted to change up the look of the room. An easy and inexpensive way to do that was to change the pillows for the sofa. I have been seeing burlap pillows around for a while now and I always really like them. Neiman Marcus has some beautiful ones right now as does Restoration Hardware but unfortunately they are pretty pricey. Here are some from Restoration Hardware.
Vintage French Linen Pillow Covers
Since I didn't feel like spending a lot of money on burlap pillows I decided to make some of my own. Instead of tossing the pillows that I already have and making all new ones I chose to make pillow slipcovers.
Here's what you'll need if you would like to make one yourself:
Burlap, thread, sewing machine, iron-on transfer paper, a computer/printer, and an iron.
You'll also need a pillow that you wish to cover.

First thing you'll need to do is measure your pillow form. Now add 1 inch to that measurement and cut out a piece of fabric that size. Ex: my pillow was 18 x 18 inches so I cut a piece of fabric that was 19X19. Then you'll need to cut out 2 pieces of fabric that is your width (in my case 19 in) and the length should be half of your width plus 2.5 inches (half of 19 is 9.5 plus 2.5 equals 12) So I cut two pieces of fabric that were 19x12. I hope that makes sense.
Now I did not surge around the edges of my fabric because I'm just using them temporarily but if you have the equipment you may want to do that. Next I took my two 19x12 pieces of fabric and along one side of the 19 inches edge, I folded the fabric over about 1/4 inch and pressed with an iron. I then folded the folded part another 1/4 inch and pressed & pinned it. I then stitched down the center of the fold to create a hem. I then did this to the other 19x12 piece.
Next lay the 19x19 piece down and lay one rectangle piece on it wrong side up and pin it together. Now take the second rectangle and do the same thing.
After you've pinned the pieces together you can sew around the entire square using whatever seam allowance you wish.
Now turn your pillow cover inside out and stuff your pillow into it.
Tada! Note: this pillow's iron on didn't turn out as well.
Now, for the print for your pillow. Find some clip art that you want to have on your pillow. I searched for "french burlap pillow" and found some cool things. I also used The Graphic Fairy which had tons of pictures to choose from. Print your graphics out on some iron on transfer paper and remember to flip the image so it will iron on correctly. After you print it then you'll need to cut it out.
Next, iron it on according to the paper's package directions.
Peal it off gently. And there you have it.
For these two pillows I used muslin instead of burlap.
Here are my burlap pillows. Like I said, the larger one didn't turn out as well, but I'm ok with it.
I think the bicycle one is my favorite.
I hope my instructions were clear enough for you. These pillows were so simple to make and very inexpensive. I'm glad I can change them out when I want to.

Tuesday, October 5, 2010

Third Time's a Charm

Two weekends ago I had the urge to paint some furniture (weird, I know). Instead of going out and buying more furniture that we don't have room for I decided to change up a piece I already had. Cory was super sweet & helpful and joined right in.
Before we got married Cory received this table from my sister, Angie, during one of her moves. Here's a picture of it, minus the doors, right after he inherited it.
Cory & I decided to paint it his favorite color:green (a very light shade and a darker one). We were really excited because it was our first piece of furniture to paint. We even signed our names & date on the bottom of it when we were done. It made me smile to see it when we were redoing it. Here's a picture of it after the first paint job.
This time around we decided to strip the paint off of the top and stain it a darker color. We decided to paint the bottom half a creamy white. Here it is now.
Here's a close up of the new pulls. They're clear crystal looking with a stain brushed on them to look antique. I got them at Hobby Lobby for about $3.00.

Saturday, October 2, 2010

I.just.can't.stop...

looking at this ADORABLE puppy. OMW (oh my word)<---I'm trying to get that phrase to catch on, haha.
Look at the little puffball. His name is Boo. I found these pictures on cuteoverload.com. Have a happy weekend & Roll Tide :)

**UPDATE** Little Boo has a facebook page. Check it.

Friday, October 1, 2010

A Whole New World

Lately I've been seeing globes in decorating magazines/design blogs and I like it. Here's a picture from Apartment Therapy that I like.
If you like the globe look too then you need to check out T.J. Maxx because they have TONS of vintage looking globes (or at least the Maxx in Tuscaloosa does). I snagged one at a reasonable price and I'm really excited about it. There were so many sizes, styles, and colors to choose from. I was torn between the golden color, the blue, and the black globes. I ended up settling on a smaller blue one.

On another note, my world is sadly changing. The "K Bug", aka my VW Beetle, is going on retirement...or at least on retirement from me. It's not as dependable as it once was and we are going to part ways. It was my dream car and I loved having it. I will miss it but I'm looking forward to having a more reliable car, one where I don't have to cross my fingers for it to start :) I hope you have a great weekend.
 

Have A Dandy Day | Creative Commons Attribution- Noncommercial License | Dandy Dandilion Designed by Simply Fabulous Blogger Templates