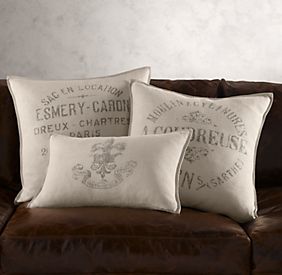
After Cory & I redid the table for our "office" I wanted to change up the look of the room. An easy and inexpensive way to do that was to change the pillows for the sofa. I have been seeing burlap pillows around for a while now and I always really like them. Neiman Marcus has some beautiful ones right now as does Restoration Hardware but unfortunately they are pretty pricey. Here are some from Restoration Hardware.
Since I didn't feel like spending a lot of money on burlap pillows I decided to make some of my own. Instead of tossing the pillows that I already have and making all new ones I chose to make pillow slipcovers.
Here's what you'll need if you would like to make one yourself:
 Burlap, thread, sewing machine, iron-on transfer paper, a computer/printer, and an iron.
 You'll also need a pillow that you wish to cover.
 Burlap, thread, sewing machine, iron-on transfer paper, a computer/printer, and an iron.
 You'll also need a pillow that you wish to cover.
First thing you'll need to do is measure your pillow form. Now add 1 inch to that measurement and cut out a piece of fabric that size. Ex: my pillow was 18 x 18 inches so I cut a piece of fabric that was 19X19. Then you'll need to cut out 2 pieces of fabric that is your width (in my case 19 in) and the length should be half of your width plus 2.5 inches (half of 19 is 9.5 plus 2.5 equals 12) So I cut two pieces of fabric that were 19x12. I hope that makes sense.
 Now I did not surge around the edges of my fabric because I'm just using them temporarily but if you have the equipment you may want to do that. Next I took my two 19x12 pieces of fabric and along one side of the 19 inches edge, I folded the fabric over about 1/4 inch and pressed with an iron. I then folded the folded part another 1/4 inch and pressed & pinned it. I then stitched down the center of the fold to create a hem. I then did this to the other 19x12 piece.
 Next lay the 19x19 piece down and lay one rectangle piece on it wrong side up and pin it together. Now take the second rectangle and do the same thing.
After you've pinned the pieces together you can sew around the entire square using whatever seam allowance you wish.
 Now turn your pillow cover inside out and stuff your pillow into it.
 Tada! Note: this pillow's iron on didn't turn out as well.
 Now, for the print for your pillow. Find some clip art that you want to have on your pillow. I searched for "french burlap pillow" and found some cool things. I also used The Graphic Fairy which had tons of pictures to choose from. Print your graphics out on some iron on transfer paper and remember to flip the image so it will iron on correctly. After you print it then you'll need to cut it out.
 Next, iron it on according to the paper's package directions.
 Peal it off gently. And there you have it.
 For these two pillows I used muslin instead of burlap.
 Here are my burlap pillows. Like I said, the larger one didn't turn out as well, but I'm ok with it.
 I think the bicycle one is my favorite.
 I hope my instructions were clear enough for you. These pillows were so simple to make and very inexpensive. I'm glad I can change them out when I want to.
No comments:
Post a Comment